🦏
ETH Home Staking Collection
DVT Home Staking Curriculum
  • The DVT Home Staking Curriculum
  • Curriculum breakdown & timeline
  • Understanding ETH validators
    • Introduction to ETH Validators
    • Roles & Responsibilities of a node operator
    • Rewards and penalties
    • Importance of client diversity
    • Distributed Validator Technologies (DVTs)
    • Economics of using DVTs (WIP)
      • Diva Staking (WIP)
      • Obol (WIP)
      • SSV (WIP)
    • Bonded Validators
    • Economics of bonded validators (WIP)
  • Hardware & systems setup
    • Setup Overview
    • Hardware & system requirements
    • Procuring your hardware
    • Assemble your hardware
    • Practicing for free on Cloud VMs
      • Google Cloud
      • Alibaba Cloud
  • Linux OS, Networking, & Security
    • Install and prepare the OS
    • Networking & network security
    • Device level security setup
    • Verifying checksums
  • Installing & configuring your EL+CL clients
    • Set up and configure execution layer client
      • Nethermind
      • Besu
      • Geth
      • Erigon
      • Reth
    • Set up and configure consensus layer client
      • Teku BN
      • Nimbus BN
      • Lodestar BN
      • Lighthouse BN
      • Prysm BN
  • Keystore generation & MEV-Boost
    • Validator key generation
    • Set up and configure MEV-boost
  • Native Solo Staking Setup
    • Validator client setup
      • Teku VC
      • Nimbus VC
      • Lodestar VC
      • Lighthouse VC
      • Prysm VC
    • Depositing 32 ETH into your validator
    • Exiting your validator
  • Monitoring, Maintenance, and Updates
    • Set up monitoring suite
      • Installing & configuring Prometheus
      • Installing & configuring Node Exporter
      • Installing & configuring Grafana
      • Beaconcha.in App API
      • Client Uptime Check
    • Maintenance & Updates
      • Nethermind
      • Besu
      • Teku
      • Nimbus
      • Lodestar
      • Updating the monitoring suite
      • Preparing for Pectra
  • DVT Setup
    • Diva Staking
      • Diva Staking client setup
        • Default - All-in-one setup
        • Advanced - with standalone Lodestar VC
      • Registering your Diva node
      • Updating your Diva client
      • Monitoring your Diva Node
    • Obol
      • Techne Bronze Speedrun (Launchpad)
      • Obol + Bonded Validators (Techne Silver)
        • Obol + Lido CSM
    • SSV
      • SSV + Lido CSM (WIP)
      • SSV Operator
      • SSV Staker
  • Bonded Validators Setup
    • Lido CSM
      • Generating CSM keystores
      • Set Fee Recipient Address
        • Method 1: Configure on validator keys
        • Method 2: Configure on separate validator client
        • Verifying Fee Recipient Registered on MEV Relays
      • Upload/Remove/View validator keys
      • Rewards & bonds
      • Exiting CSM validators
        • "Lazy" exits (TESTNET ONLY)
        • Proper Exits
      • Role/Address management
      • Monitoring
      • Automations
        • CSM with ETHPillar
        • CSM with ETH Docker
        • CSM with Dappnode
    • Puffer
      • Non-Enclave: 2 ETH
    • Ether.fi
      • Receive distributed validator keyshares
    • Stader (WIP)
    • Rocketpool (WIP)
  • Liquid Staking Vaults
    • Stakewise V3
  • Mainnet
    • Mainnet Deployment
    • Heroglpyhs (WIP)
  • Best practices
    • Slashing prevention
    • Maximising uptime and performance
    • Optimising security
    • Managing your withdrawal wallet
  • Tips
    • Advanced networking
    • Downloading files from your node
  • Useful resources
    • General resources
    • Holesky Faucets
  • Automation/tools
    • ETHPillar
    • ETH Docker
    • Automated power on/off
      • Wake-on-LAN (WoL)
      • Network UPS Tools (NUT)
    • Validator Healthcheck Alerts
  • Solo Stakers Guild
    • Lido CSM+SSV+Obol (Testnet)
Powered by GitBook
On this page
  • Updating Nethermind
  • Download Nethermind and configure the service
  • Restart the Nethermind service
  • Pruning Nethermind
  • Activating pruning mode
  • Monitoring pruning progress
  • Tips
  1. Monitoring, Maintenance, and Updates
  2. Maintenance & Updates

Nethermind

PreviousMaintenance & UpdatesNextBesu

Last updated 1 year ago

Updating Nethermind

Download Nethermind and configure the service

the latest version of Nethermind and run the checksum verification process to ensure that the downloaded file has not been tampered with.

cd
curl -LO https://github.com/NethermindEth/nethermind/releases/download/1.25.4/nethermind-1.25.4-20b10b35-linux-x64.zip
echo "05848eaab4b1b621054ff507e8592d17 nethermind-1.25.4-20b10b35-linux-x64.zip" | md5sum --check

Each downloadable file comes with it's own checksum (see below). Replace the actual checksum and URL of the download link in the code block above.

Make sure to choose the amd64 version. Right click on the linked text and select "copy link address" to get the URL of the download link to curl.
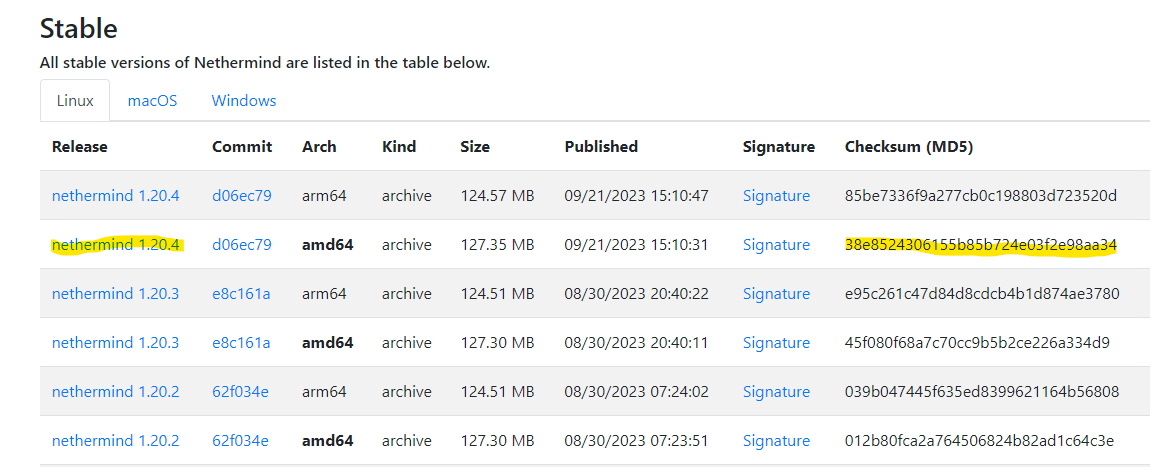
Expected output: Verify output of the checksum verification

nethermind-1.25.4-20b10b35-linux-x64.zip: OK

If checksum is verified, extract the files and move them into the (/usr/local/bin) directory for neatness and best practice. Then, clean up the duplicated copies.

unzip nethermind-1.25.4-20b10b35-linux-x64.zip -d nethermind
sudo cp -a nethermind /usr/local/bin/nethermind
rm -r nethermind-1.25.4-20b10b35-linux-x64.zip nethermind

Restart the Nethermind service

Reload the systemd daemon to register the changes made, start Nethermind, and check its status to make sure its running.

sudo systemctl start nethermind.service
sudo systemctl status nethermind.service

Expected output: The output should say Nethermind is “active (running)”. Press CTRL-C to exit and Nethermind will continue to run.

Use the following command to check the logs of Nethermind’s syncing process. Watch out for any warnings or errors.

sudo journalctl -fu nethermind -o cat | ccze -A

Press CTRL-C to exit.

Pruning Nethermind

Activating pruning mode

Your ETH validator node will use up the available disk space over time as the state grows. In order to avoid out-of-storage errors, it is advisable to prune your execution clients periodically.

Nethermind is able to run its pruning process in the background without interrupting it's operations but it is very heavy task so you will experience some performance degradation during this time (~20 - 30 hours).

To enable the pruning process for Nethermind, open up the systemd configuration file:

sudo nano /etc/systemd/system/nethermind.service

and append the following flags into the [Service] section of the file depending on your preference of pruning method.

[Service]
<existing_flags> \
--Pruning.Mode=Hybrid \
--Pruning.FullPruningTrigger=Manual

This will start the pruning process once you reload the daemon and restart the service.

[Service]
<existing_flags> \
--Pruning.Mode=Hybrid \
--Pruning.FullPruningTrigger=VolumeFreeSpace \
--Pruning.FullPruningThresholdMb=300000

This will instruct Nethermind to activate its pruning mechanism once the amount of available free space on your disk falls below 300GB.

Note: The recommended threshold is 250GB but lets be a little more prudent.

[Service]
<existing_flags> \
--Pruning.Mode=Hybrid \
--Pruning.FullPruningTrigger=StateDbSize \
--Pruning.FullPruningThresholdMb=1200000

This will instruct Nethermind to activate its pruning process once the state size grows beyond 1.2TB.

Save with Ctrl+O and Enter, then exit with Ctrl+X.

Restart the daemon and the Nethermind service.

sudo systemctl daemon-reload
sudo systemctl restart nethermind.service
sudo systemctl status nethermind.service

Expected output: The status should say Nethermind is "active (running)".

Monitoring pruning progress

If you have configured the pruning mode correctly, you should see the following logs

At initiation:

Full Pruning Ready to start: pruning garbage before state BLOCK_NUMBER with root ROOT_HASH. WARN: Full Pruning Started on root hash ROOT_HASH: do not close the node until finished or progress will be lost.

*As the warning states, do not restart your node from here on until the pruning process is completed. Else you will have to restart the whole pruning process, or worse, end up with a corrupted database.

After a few minutes, you will start to see some progress logs:

Full Pruning In Progress: 00:00:57.0603307 1.00 mln nodes mirrored. Full Pruning In Progress: 00:01:40.3677103 2.00 mln nodes mirrored. Full Pruning In Progress: 00:02:25.6437030 3.00 mln nodes mirrored.

When the pruning process is completed, you will see the following output:

Full Pruning Finished: 15:25:59.1620756 1,560.29 mln nodes mirrored.

Tips

The pruning process can take more than 30 hours to complete (depending on CPU and IO speeds). During this time, you may experience degraded performance on your validator node - i.e. missing ~10% of attestations.

Hence, it is important to time your pruning schedule to avoid coinciding with your scheduled sync committee or block proposer duties. You can check for these below.

If you want to trigger the pruning process immediately, set the threshold of the following flag to whatever amount your available disk space is left with.

--Pruning.FullPruningThresholdMb=<bytes>

Run df -h on your terminal to find out how much available disk space you have remaining.

Check scheduled sync committee duties
Check scheduled block proposal duties
Download