🦏
ETH Home Staking Collection
DVT Home Staking Curriculum
  • The DVT Home Staking Curriculum
  • Curriculum breakdown & timeline
  • Understanding ETH validators
    • Introduction to ETH Validators
    • Roles & Responsibilities of a node operator
    • Rewards and penalties
    • Importance of client diversity
    • Distributed Validator Technologies (DVTs)
    • Economics of using DVTs (WIP)
      • Diva Staking (WIP)
      • Obol (WIP)
      • SSV (WIP)
    • Bonded Validators
    • Economics of bonded validators (WIP)
  • Hardware & systems setup
    • Setup Overview
    • Hardware & system requirements
    • Procuring your hardware
    • Assemble your hardware
    • Practicing for free on Cloud VMs
      • Google Cloud
      • Alibaba Cloud
  • Linux OS, Networking, & Security
    • Install and prepare the OS
    • Networking & network security
    • Device level security setup
    • Verifying checksums
  • Installing & configuring your EL+CL clients
    • Set up and configure execution layer client
      • Nethermind
      • Besu
      • Geth
      • Erigon
      • Reth
    • Set up and configure consensus layer client
      • Teku BN
      • Nimbus BN
      • Lodestar BN
      • Lighthouse BN
      • Prysm BN
  • Keystore generation & MEV-Boost
    • Validator key generation
    • Set up and configure MEV-boost
  • Native Solo Staking Setup
    • Validator client setup
      • Teku VC
      • Nimbus VC
      • Lodestar VC
      • Lighthouse VC
      • Prysm VC
    • Depositing 32 ETH into your validator
    • Exiting your validator
  • Monitoring, Maintenance, and Updates
    • Set up monitoring suite
      • Installing & configuring Prometheus
      • Installing & configuring Node Exporter
      • Installing & configuring Grafana
      • Beaconcha.in App API
      • Client Uptime Check
    • Maintenance & Updates
      • Nethermind
      • Besu
      • Teku
      • Nimbus
      • Lodestar
      • Updating the monitoring suite
      • Preparing for Pectra
  • DVT Setup
    • Diva Staking
      • Diva Staking client setup
        • Default - All-in-one setup
        • Advanced - with standalone Lodestar VC
      • Registering your Diva node
      • Updating your Diva client
      • Monitoring your Diva Node
    • Obol
      • Techne Bronze Speedrun (Launchpad)
      • Obol + Bonded Validators (Techne Silver)
        • Obol + Lido CSM
    • SSV
      • SSV + Lido CSM (WIP)
      • SSV Operator
      • SSV Staker
  • Bonded Validators Setup
    • Lido CSM
      • Generating CSM keystores
      • Set Fee Recipient Address
        • Method 1: Configure on validator keys
        • Method 2: Configure on separate validator client
        • Verifying Fee Recipient Registered on MEV Relays
      • Upload/Remove/View validator keys
      • Rewards & bonds
      • Exiting CSM validators
        • "Lazy" exits (TESTNET ONLY)
        • Proper Exits
      • Role/Address management
      • Monitoring
      • Automations
        • CSM with ETHPillar
        • CSM with ETH Docker
        • CSM with Dappnode
    • Puffer
      • Non-Enclave: 2 ETH
    • Ether.fi
      • Receive distributed validator keyshares
    • Stader (WIP)
    • Rocketpool (WIP)
  • Liquid Staking Vaults
    • Stakewise V3
  • Mainnet
    • Mainnet Deployment
    • Heroglpyhs (WIP)
  • Best practices
    • Slashing prevention
    • Maximising uptime and performance
    • Optimising security
    • Managing your withdrawal wallet
  • Tips
    • Advanced networking
    • Downloading files from your node
  • Useful resources
    • General resources
    • Holesky Faucets
  • Automation/tools
    • ETHPillar
    • ETH Docker
    • Automated power on/off
      • Wake-on-LAN (WoL)
      • Network UPS Tools (NUT)
    • Validator Healthcheck Alerts
  • Solo Stakers Guild
    • Lido CSM+SSV+Obol (Testnet)
Powered by GitBook
On this page
  • Network architecture
  • Network security model
  1. Linux OS, Networking, & Security

Networking & network security

PreviousInstall and prepare the OSNextDevice level security setup

Last updated 1 year ago

Network architecture

There are 2 ways to prepare your home network for your validator node.

ISPs in some countries combine both modem and routers into a single device.

It is entirely possible and also sufficiently safe to connect your validator node directly to your existing home router if you do not plan to have un-trusted guests over at your home often.

  • Secure your node router properly by setting strong passwords on the WIFI and device level. Do not expose these passwords or let anyone else connect to the WIFI network or log in to the device level of your node router.

Adding a dedicated router in between your validator node and existing home router offers a greater level of segregation and adds another security layer. Useful if you plan to host guests at home frequently.
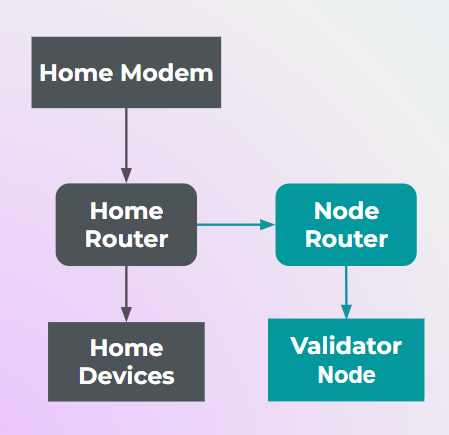
  • Your existing home router will first be connected to a dedicated "node router" on the downstream via cable. This node router will be set to "router" mode and not "Access Point (AP)" mode - this will create a subnet within your main network for segregation of your regular home devices from your validator node setup.

  • The validator node will be connected to the node router further downstream via cable

  • Secure your node router properly by setting strong passwords on the WIFI and device level. Do not expose these passwords or let anyone else connect to the WIFI network or log in to the device level of your node router.

  • You will need to be connected to the WIFI network of your Node Router in order to access your Validator Node using a separate device (e.g. working laptop)

If you need to be away from home for long periods, port forwarding will need to be configured on both your Home Modem and your Home Router (i.e. Modem->Home Router->Node Router) to allow incoming connections from outside of your home network.

  • This is so that you can access your validator node for troubleshooting and maintenance even if you are not at home.

  • Turn off port forwarding on your Home Modem when you are no longer away from home

Check out the Port Forwarding page below after you are done setting up your validator node.

Network security model

  1. Your validator node will be secured with an SSH key so that only users who have this SSH key can access it

  2. Any home devices that become compromised will not be able to access your validator node which sits in a separate subnet

  3. If you think your SSH keys could be leaked, turn off any port forwarding settings and change the SSH key pair in your Validator Node

Advanced networking