Device level security setup
Configure remote access via SSH keypair
Generating an SSH key pair
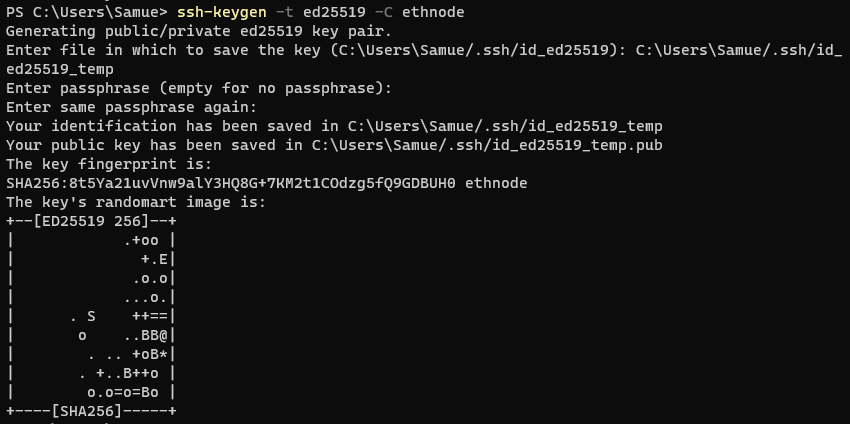
On your client machine (e.g. working laptop), open up your terminal (Mac) or Windows Powershell (Windows) and run:
ssh-keygen -t ed25519 -C <USERNAME>Replace <USERNAME> with your actual username if you are using cloud VMs. Your username typically comes before the "@" symbol in your VM's terminal.
Press Enter and set a password to encrypt your SSH private key.
Expected output:

Add SSH pubkey to your Node
While the private key portion of the SSH keypair stays in your working laptop, we will need to add the public key portion to your Node.
On your working laptop, run:
Enter the password of your NUC device when prompted.
The IP Address of your NUC device can be found via:
Running
ip aon the terminal of your NUC device (connect a monitor & keyboard during the initial setup)Logging into your home router and look for the connected NUC device. The assigned IP Address will be displayed here
Print out the SSH pubkey string and copy it. On your working laptop, run:
You will see a similar output below:
SSH into your NUC and enter your password when prompted:
Create the authorized SSH key file manually.
Paste your copied SSH pubkey string into the authorized_keys file and press CTRL + O, enter, CTRL + X to save the file and exit.
Print out the SSH pubkey string and copy it. On your working laptop, run:
You will see a similar output below:
Copy this SSH pubkey and enter it into your Google Cloud VM.
SSH into your VM with your custom SSH key.
Change the SSH port and disable remote password login
Uncomment
#AuthorizedKeysFileif it is commented (by removing the#in front of it)Change
KbdInteractiveAuthentication yestoKbdInteractiveAuthentication noand uncomment (by removing the#in front of it)Change
PasswordAuthentication yestoPasswordAuthentication noand uncomment (by removing the#in front of it)Change
#PermitRootLogin prohibit-passwordtoPermitRootLogin no, removing the#prefix
Once you're done, save with Ctrl+O and Enter, then exit with Ctrl+X.
Now we restart the SSH server so it registers the new settings:
Now you will only be able to access your node remotely using your SSH private key. The command for your SSH connection will be amended slightly from before to:
Configure firewall rules
The basic rules we will implement on your NUC device are:
Deny all incoming traffic by default
Allow all outgoing traffic by default
Allow incoming traffic via port
<your_chosen_SSH_port>for SSH accessAllow incoming traffic via port 30303 and 30304 for the execution clients to connect with other nodes
Allow incoming traffic via port 9000 and 9001 for the consensus clients to connect with other nodes
Allow incoming traffic via port 3000 and 3001 for Grafana to display monitoring dashboards for your node
With these configurations set up, you will have blocked off all but 4 possible openings for potential attackers to enter from.
Ports 30303 and 9000 will be used by Nethermind and Teku. We will create dedicated user accounts with root access disabled for these services
Port 3000 is only accessible within your local area network (i.e. not exposed to the public internet
Your chosen SSH port is secured by your SSH private key so its virtually impossible to brute force the access.
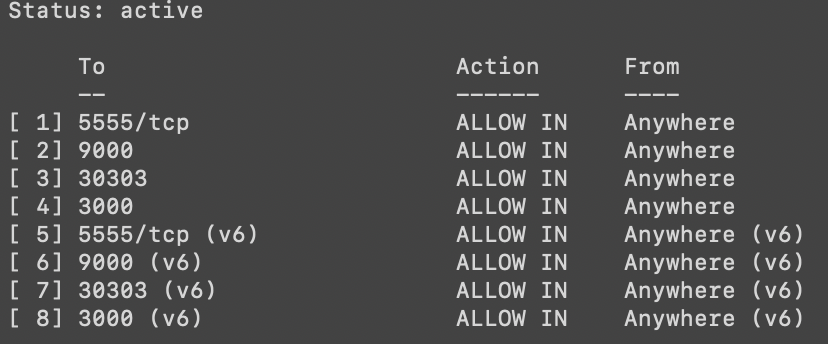
Turn on the firewall
Now lets turn the firewall on and check our configurations before moving on.
You should see something similar to the screenshot below:

Set up brute force protection
Even though having our SSH key access implemented means an attacker will need 25 million years to try all combinations, lets go ahead and make it even harder for them - by limiting the number of attempts per IP address to 5 tries and blocking them after.
Install the software:
Open the configuration file:
Add the following contents to the configuration file:
Once you're done, save and exit with Ctrl+Oand Enter, then Ctrl+X.
Finally, restart the service:
Enable automatic security updates
Add the following contents to the configuration file:
Once you're done, save and exit with Ctrl+Oand Enter, then Ctrl+X.
Finally, restart the service:
Check the logs for any warnings:
If you see following warnings, proceed to the next step.
If your device is definitely connected to a power source, amend the 50unattended-upgrades file directly.
Look for the following line and uncomment it by removing the // prefix.
Once you're done, save and exit with Ctrl+Oand Enter, then Ctrl+X. Then restart your Unattended Upgrades service.
Last updated